배경
2022년 3월 29일에 React v18.0을 정식적으로 사용할 수 있게 되었습니다. 가장 큰 변화는 automatic batching, new APIs like startTransition, and streaming server-side rendering with support for Suspense와 같은 concurrent feature를 사용할 때 Concurrent Rendering 을 지원한다는 점 입니다.
기존에 React 에서는 UI를 렌더링할 때 우선순위 큐나 다중 버퍼링과 같은 기술을 사용하여 동시에 렌더링 되는것처럼 보이게 하였고 사용자는 UX를 어떻게 보여줄지에 집중하고 이 동시성이 어떻게 작동하는지 아는것은 기대하지 않는다고 합니다.
근데 Concurrent React 는 high level 에서는 어떻게 리액트 코어 렌더링 모델이 동시성을 갖고 렌더링하는지 알만한 가치가 있습니다. 일반적인 동기식에서는 한번 렌더링을 시작하면 멈출 수 없었지만 Concurrent React feature를 사용하여 렌더링을 중단할 수 있다는 점입니다. DOM의 변화가 끝날 때 까지 기다렸다가 전체 트리가 평가되면 UI가 나타나게 보장해주고 메인 쓰레드의 Blocking 없이 또 다른 화면을 준비할 수 있습니다.
이러한 방법으로 다음과 같이 사용할 수 있습니다.
예시 1) UI 가 큰 렌더링 작업중이더라도 사용자의 입력에 먼저 반응하는 방식으로 좋은 UX를 이끌어 낼 수 있습니다.
예시 2) 사용자가 다른 탭으로 갔다가 돌아올 때 이전 상태와 동일한 상태로 복원하고 싶을 때 새로운 (아직은 지원하지 않는) <Offscreen> 이라는 컴포넌트를 통해 새로운 UI를 백그라운드에서 준비하여 사용자가 보기 전에 준비될 수 있도록 하는 이전 상태에 대한 reusuable state를 만들 수 있습니다.
마이그레이션
Client Rendering API 변경점
새로운 루트 API - createRoot가 나오며 더 이상 render 함수를 지원하지 않습니다.
// Before
import { render } from 'react-dom';
const container = document.getElementById('app');
render(<App tab="home" />, container);

// After
import { createRoot } from 'react-dom/client';
const container = document.getElementById('app');
const root = createRoot(container); // createRoot(container!) if you use TypeScript
root.render(<App tab="home" />);
// Before
unmountComponentAtNode(container);
// After
root.unmount();
이전에 Suspense 를 사용할 때 callback 이 제공되었는데 예상되는 콜백이 없어 제거되었습니다.
// Before
const container = document.getElementById('app');
render(<App tab="home" />, container, () => {
  console.log('rendered');
});

// After
function AppWithCallbackAfterRender() {
  useEffect(() => {
    console.log('rendered');
  });

  return <App tab="home" />
}

const container = document.getElementById('app');
const root = createRoot(container);
root.render(<AppWithCallbackAfterRender />);
SSR과 함께 hydration을 사용하는 경우 hydrateRoot로 마이그레이션이 필요합니다.
// Before
import { hydrate } from 'react-dom';
const container = document.getElementById('app');
hydrate(<App tab="home" />, container);

// After
import { hydrateRoot } from 'react-dom/client';
const container = document.getElementById('app');
const root = hydrateRoot(container, <App tab="home" />);
// Unlike with createRoot, you don't need a separate root.render() call here.
Typescript 정의
children props를 정의할 때 props를 명시적으로 나열해야 합니다.
interface MyButtonProps {
  color: string;
  children?: React.ReactNode;}
IE 지원 중단
React 18에 도입된 새로운 기능은 IE에서 적절하게 폴리필할 수 없는 마이크로태스크와 같은 최신 브라우저 기능을 사용하여 구축되었기 때문에 Internet Explorer를 지원해야 하는 경우 React 17을 유지하는 것이 좋습니다.
테스트 환경 구성
테스트 하기전에 globalThis.IS_REACT_ACT_ENVIROMENT flag를 통해 unit test 환경임을 제공하면 React Testing Library 추가 구성 없이 act를 사용할 수 있습니다.
// In your test setup file
globalThis.IS_REACT_ACT_ENVIRONMENT = true;
주요 특징
Auto Batching
- React 18 업데이트만으로 과거 setTimeout, Promise 등에서 2번 렌더링 되던게 1번 렌더링 됩니다.
// After React 18 updates inside of timeouts, promises,
// native event handlers or any other event are batched.

function handleClick() {
  setCount(c => c + 1);
  setFlag(f => !f);
  // React will only re-render once at the end (that's batching!)
}

setTimeout(() => {
  setCount(c => c + 1);
  setFlag(f => !f);
  // React will only re-render once at the end (that's batching!)
}, 1000);
이전 버전 처럼 두번 렌더링을 하고 싶다면, 아래와 같이 flushSync를 통해 구현하면 opt-out 됩니다.
import { flushSync } from 'react-dom';

function handleClick() {
  flushSync(() => {
    setCounter(c => c + 1);
  });
  // React has updated the DOM by now
  flushSync(() => {
    setFlag(f => !f);
  });
  // React has updated the DOM by now
}
Strict Mode 동작 방식의 변경
React 는 상태를 포함한 UI 를 추가하고 제거할 수 있는 기능을 추가하려 합니다. 위에 배경에서 이야기 했던 것 처럼 탭으로 이동 하고 다시 돌아 왔을 때 상태를 트리에서 마운트 해제하고 다시 마운트 해야 합니다.
Offscreen 은 unmount되었을 때 뿐만 아니라 화면에서 사라졌을 경우에도 상태를 유지하여 다시 컴포넌트가 나타났을 때에 이전과 동일한 기능을 유지하기 위해서 unmount -> mount 과정을 똑같이 거친다고 여기고 있고 그렇기 때문에
- componentDidMount
- componentWillUnmount
- useEffect
- useLayoutEffect
- useInsertionEffect
를 통해 여러번 마운트 해제 및 마운트가 발생되야하는 상황에 일부 한 번만 장착되거나 해제 되는 side effect를 줄이기 위해 개발 모드에서만 component를 마운트 해제하고 마운트하는 과정이 추가 되었습니다.
* React mounts the component.
* Layout effects are created.
* Effects are created.
* React simulates unmounting the component.
* Layout effects are destroyed.
* Effects are destroyed.
* React simulates mounting the component with the previous state.
* Layout effects are created.
* Effects are created.
새로운 Hook
useId - client와 server에 동일한 unique ID를 만들어 render tree를 만들 때 hydration 불일치를 해결할 수 있다.
function PasswordField() {
  const passwordHintId = useId();
  return (
    <>
      <label>
        Password:
        <input
          type="password"
          aria-describedby={passwordHintId}
        />
      </label>
      <p id={passwordHintId}>
        The password should contain at least 18 characters
      </p>
    </>
  );
}
일반적으로 a11y를 지원하기 좋다. 단, list 에서 key는 데이터를 기반으로 만들고 useId를 사용하지 않도록 한다.
useTransition, startTransition - 일부 상태를 지연시킬 때 사용합니다. 탭을 전환할 때, 전환하고자 하는 탭에서 UI 렌더링 할 요소가 많아 그리고 있을 때 다른 버튼을 클릭한다면 메인 쓰레드가 사용중이라 UI 가 응답하지 않게 되고 잘못된 탭을 클릭해서 다시 돌아가고 싶더라도 기다려야 하는 UX가 되어버립니다. 이러한 경우 startTransition을 통해 렌더링을 멈춰 UX를 향상시킬 수 있습니다.
import { useTransition } from 'react';

export default function TabButton({ children, isActive, onClick }) {
  const [isPending, startTransition] = useTransition();
  if (isActive) {
    return <b>{children}</b>
  }
  if (isPending) {
    return <b className="pending">{children}</b>;
  }
  return (
    <button onClick={() => {
      startTransition(() => {
        onClick();
      });
    }}>
      {children}
    </button>
  );
}
useDeferedValue - 트리에서 덜 중요한 부분의 리렌더링을 지연시킬 때 디바운싱과 비슷한 목적에 사용할 수 있습니다. 대신 고정된 시간이 없으므로, 첫번째 렌더링이 반영 되는 즉시 지연 렌더링을 시도합니다. 이 지연 렌더링은 멈출 수 있어서 유저의 입력을 차단하지 않습니다.
export default function App() {
  const [query, setQuery] = useState('');
  const deferredQuery = useDeferredValue(query);
  return (
    <>
      <label>
        Search albums:
        <input value={query} onChange={e => setQuery(e.target.value)} />
      </label>
      <Suspense fallback={<h2>Loading...</h2>}>
        <SearchResults query={deferredQuery} />
      </Suspense>
    </>
  );
}
useTransition vs useDeferedValue - 두 개 모두 UI 지연 렌더링을 목적으로 하지만 useTransition 은 함수의 실행의 우선순위를 지정하고 useDeferedValue는 값의 업데이트 대한 우선 순위를 지정한다.
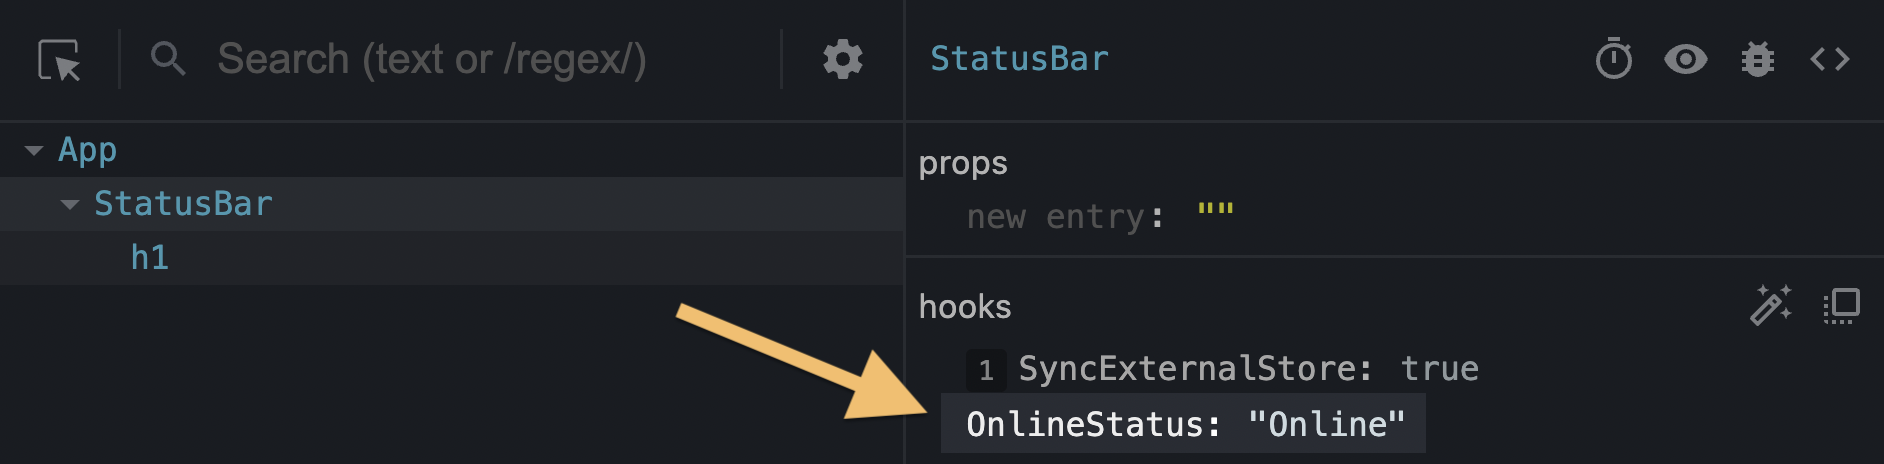
useDebugValue - React Dev Tools 에서 custom hook 에 레이블을 추가 할 수 있습니다.
export function useOnlineStatus() {
  const isOnline = useSyncExternalStore(subscribe, () => navigator.onLine, () => true);
  useDebugValue(isOnline ? 'Online' : 'Offline');
  return isOnline;
}
useSyncExternalStore - 저장소에 대한 업데이트를 강제로 동기화하여 외부 저장소가 동시 읽기를 지원할 수 있도록 하는 새로운 훅입니다. 최근 zustand 와 같은 라이브러리를 보면 별도의 provider 없이도 상태관리가 가능합니다. 이에 관한 내용은 추가로 useSyncExternalStore와 zustand 관련하여 포스팅하겠습니다.
useImperativeHandle - parent node에 ref를 노출하기 위해 forwardRef 를 사용합니다. <Modal isOpen={isOpen} /> 일반적으로는 isOpen 과 같이 prop으로 전달해줄 수 있지만 scrolling, focusing, trigering an animation, selecting text와 같은 명령형 행동들을 표현하기 쉽지 않을 때 노출시킬 수 있습니다.
import { forwardRef, useRef, useImperativeHandle } from 'react';

const MyInput = forwardRef(function MyInput(props, ref) {
  const inputRef = useRef(null);

  useImperativeHandle(ref, () => {
    return {
      focus() {
        inputRef.current.focus();
      },
      scrollIntoView() {
        inputRef.current.scrollIntoView();
      },
    };
  }, []);

  return <input {...props} ref={inputRef} />;
});
useLayoutEffect - 성능 저하가 있을 수 있어 가능하면 useEffect를 사용하라고 하지만 화면을 그리기 전 다시 레이아웃을 측정할 수 있게 해준다. 특정 경우 값을 알 수 없어 state를 이용하고 useEffect 훅 안에서 계산 혹은 API와 통신하여 값을 받을 때 화면이 먼저 그려지고 갑자기 상태로 정한 높이가 변화한다거나 텍스트가 깜빡일 경우 사용할 수 있다.
function Tooltip() {
  const ref = useRef(null);
  const [tooltipHeight, setTooltipHeight] = useState(0); // You don't know real height yet

  useLayoutEffect(() => {
    const { height } = ref.current.getBoundingClientRect();
    setTooltipHeight(height); // Re-render now that you know the real height
  }, []);

  // ...use tooltipHeight in the rendering logic below...
}
useInsertionEffect - CSS-in-JS 라이브러리를 이용하는 경우에 렌더링 도중에 스타일을 삽입하여 성능을 개선할 수 있는 훅이다. CSS-in-JS 라이브러리를 위한 훅으로 일반적인 어플리케이션 개발에는 사용될 일은 없다고 한다. DOM이 변경된 후 실행되지만 새로운 레이아웃을 읽기 전 브라우저에 양보하여 레이아웃을 다시 계산할 수 있는 기회를 주기에 중요한 훅이다.
새로운 훅이 많이 나왔음에도 대부분의 경우에는 사용하지 않는게 유리하다고 합니다. useMemo, useCallback, useLayoutEffect, useTransition, useImperativeHandle 과 같은 훅이 언제 사용되야 하는지 잘 이해하고 있고 퍼포먼스적 고도화를 위해 적절한 시점에 어쩔 수 없다면 사용하는게 권장되므로 무분별한 사용은 하지 않는게 좋습니다.
공식문서
https://reactjs.org/blog/2022/03/29/react-v18.html
React v18.0 – React Blog
React 18 is now available on npm! In our last post, we shared step-by-step instructions for upgrading your app to React 18. In this post, we’ll give an overview of what’s new in React 18, and what it means for the future. Our latest major version inclu
reactjs.org
'software engineering > frontend' 카테고리의 다른 글
| React - Use() Hook (0) | 2023.03.29 |
|---|---|
| React- 어떤 상태 관리 라이브러리를 사용할까? (0) | 2023.03.27 |
| Compression Javascript (0) | 2023.03.04 |
| CLS (Cumulative Layout Shift) (0) | 2023.03.03 |
| content-visibility: 렌더링 속도를 향상시키는 CSS property (0) | 2023.03.02 |
